What are In-App Events and how to set them up in the App Store Connect
Many mobile applications have special events that take place during their development. It could be a new feature, or it could be a special offer. Maybe it’s a big update that completely redesigns the UI? Maybe it’s a competition that allows users to race each other to win a reward? Maybe the game has some new levels that can only be beaten in a certain amount of time?
Possibilities are numerous. To take full advantage of these events and engage your users, you can use In-App Events available in the App Store. Every time you prepare something special for your audience, In-App Events will make it easier for you to inform them about it and encourage them to use your app. Let's explore this topic further.
Contents
What are In-App Events
In-App Events are a feature of Apple’s App Store that helps you promote events occurring in your app. Whenever an event with defined start and end times that lasts no longer than a month is taking place, you can use this feature to make it visible on the product page of your application. It will appear either below or above the media section with your screenshots and promotional videos.
This way all people visiting your page will quickly learn of your event, even if they’re not users of your app yet. Additionally, people will be able to find such events via the standard App Store search mechanism. It’s even possible for them to be featured in the App Store’s Today tab, after contacting Apple’s promotion team.
About In-App Events
The two main purposes of the App Store’s In-App Events feature are attracting new users and keeping those already using your app engaged. These events are widely promoted, can be found in many places throughout the App Store and allow users to opt-in for notifications to be reminded about the event start. All these ways to find your event will be available to all people using devices with iOS or iPadOS 15 and above, which is around 80% of all users worldwide, both for iPhones and iPads.
Before you start working on your In-App Event make sure you have the right role in your team on the App Store Connect. To create an In-App Event you must have a role of the Account Holder, an App Manager or an Admin.
You can set the publish date for your In-App Event to up to 14 days before the event itself begins in your app. This allows you to start raising awareness and gathering users early to ensure high engagement. The event itself can last no more than 31 days. You can configure the publish, the start and the end date separately for each region your app is available in. It’s also possible to make your event exclusive to some regions or customize the dates separately for each region if it fits your marketing strategy better.
You can have multiple In-App Events being active at the same time, but there are limits. An app can have a maximum of 5 In-App Events at once and you can have no more than 10 In-App Events in all your apps combined. These limits include In-App events that are scheduled to be published, already published and waiting to start, and in progress.
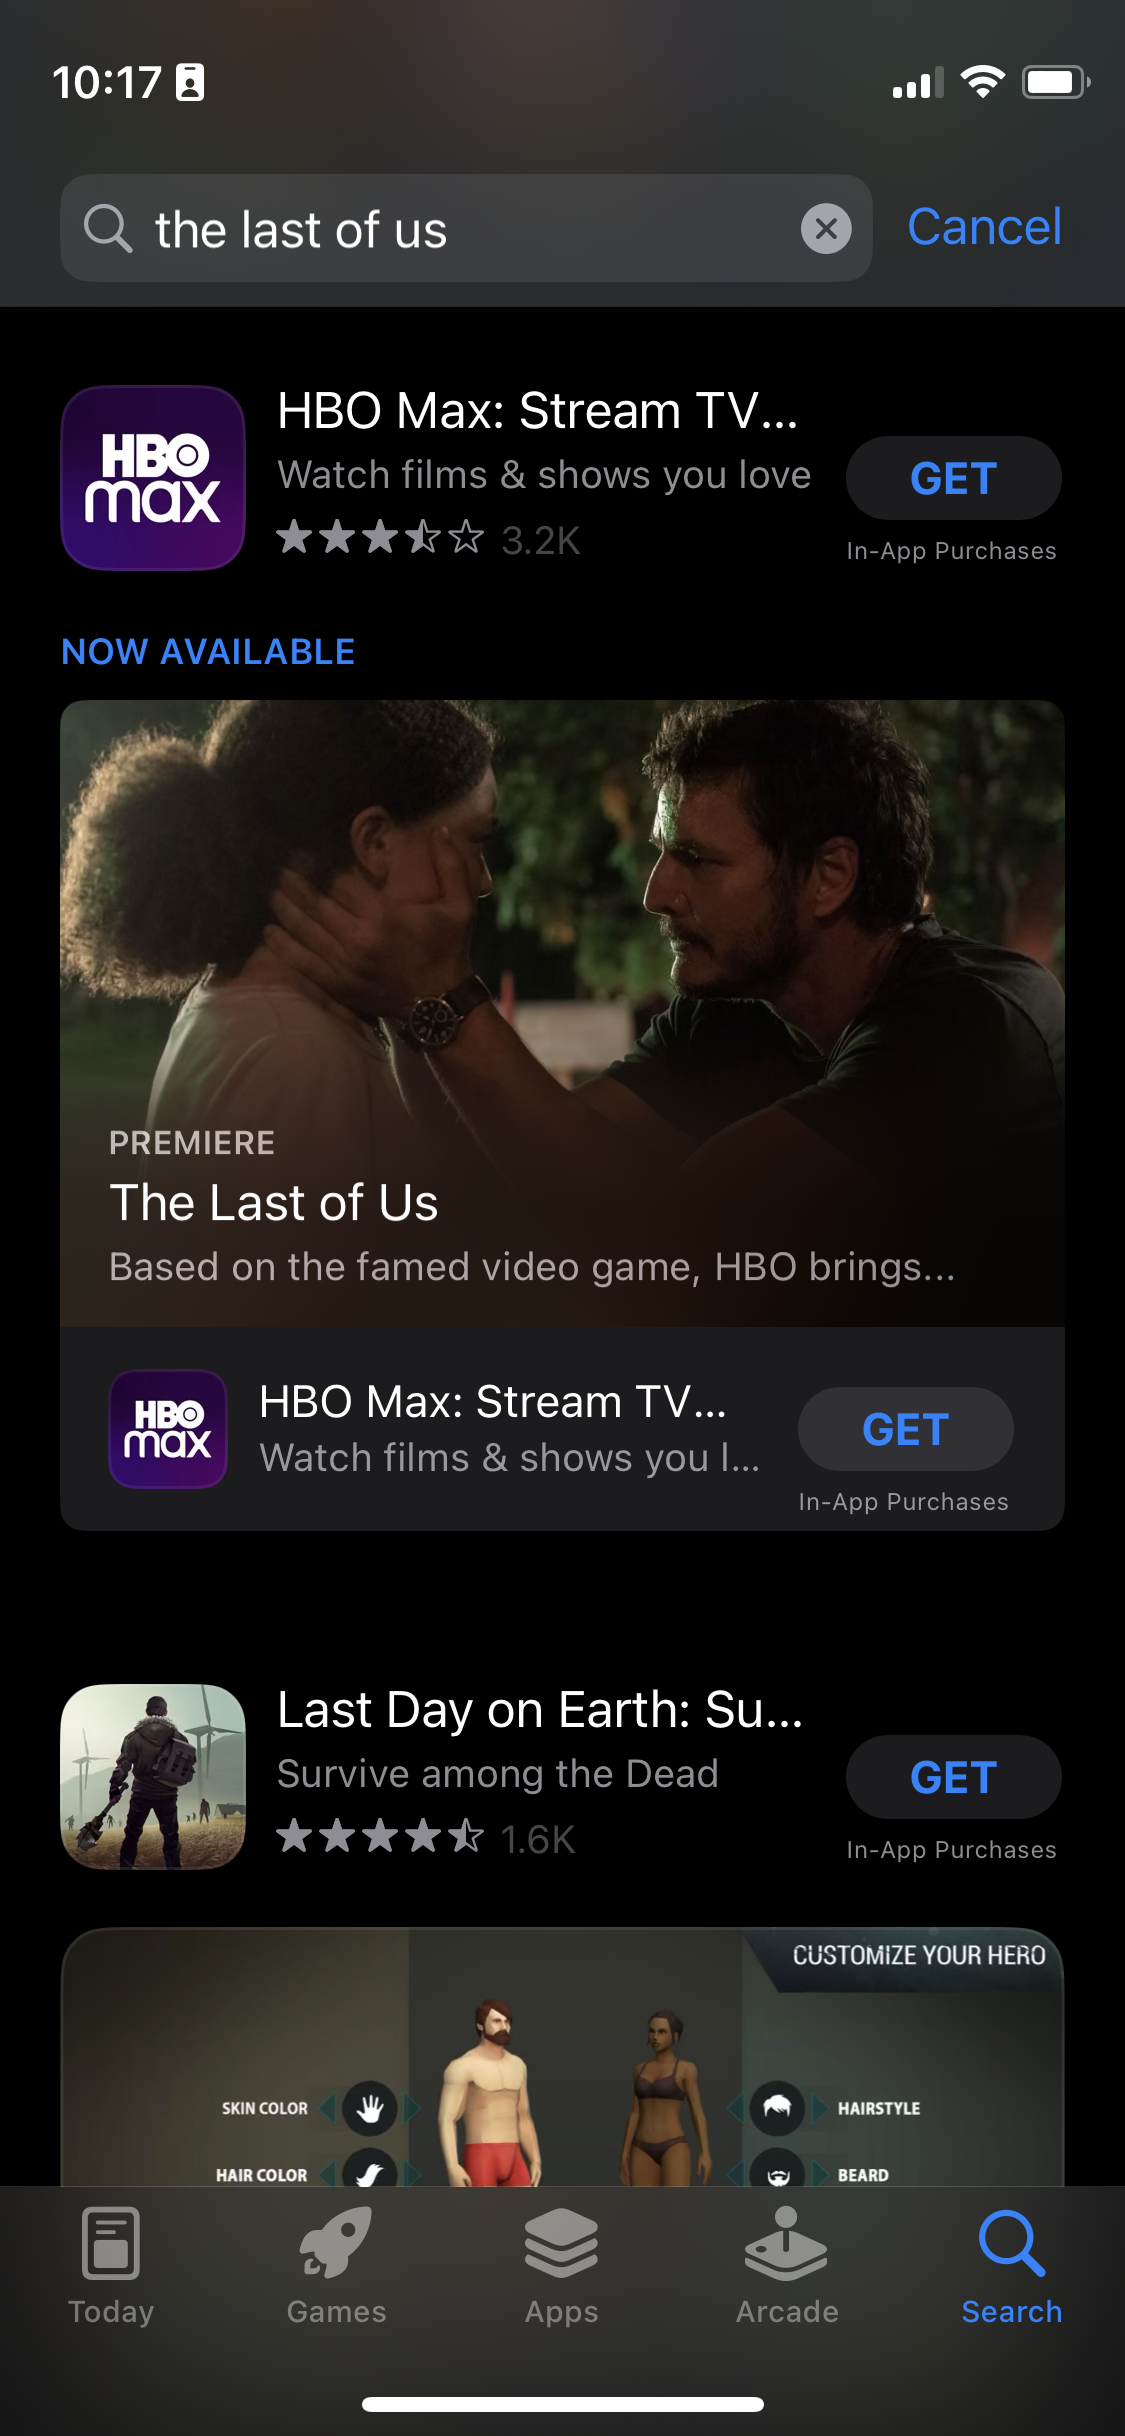
The first experience the users will have with your In-App Event will be in the form of an Event Card. This card is an introduction to your event. It will appear on your Product Page, in the search results and will be displayed in App Store’s Today, Games and Apps tabs. This card contains a background image or video, the event’s type, a name, a short description and either a purchase or a download button.
Below you will find an example of an In-App Event in the HBO Max app used to promote the premiere of their new series, The Last of Us. Notice how this card appears in search results and the phrase entered into the search bar was “the last of us”. This proves how much easier your app is to find if it has a well-named event that people will search for.
Now let’s see the same event card, this time on the app’s Product Page. I will provide two screenshots to show you how a new user and an existing one will experience the In-App events on your Product Page. The first screenshot, on the left, was taken before I’ve ever downloaded the HBO Max app. Notice how the In-App Events section is below the media and the description.
This way new users entering your Product Page will first see the experience you prepared for them, the media that show what’s best in your app and the description that helps them get more familiar with it and decide whether it’s what they’re looking for. Existing users, however, know what your app is about.
They don’t need to see the promotional media and the description again. That is why, on the screenshot on the right, taken after I installed and opened the app, we can see the events section right on top of the page.


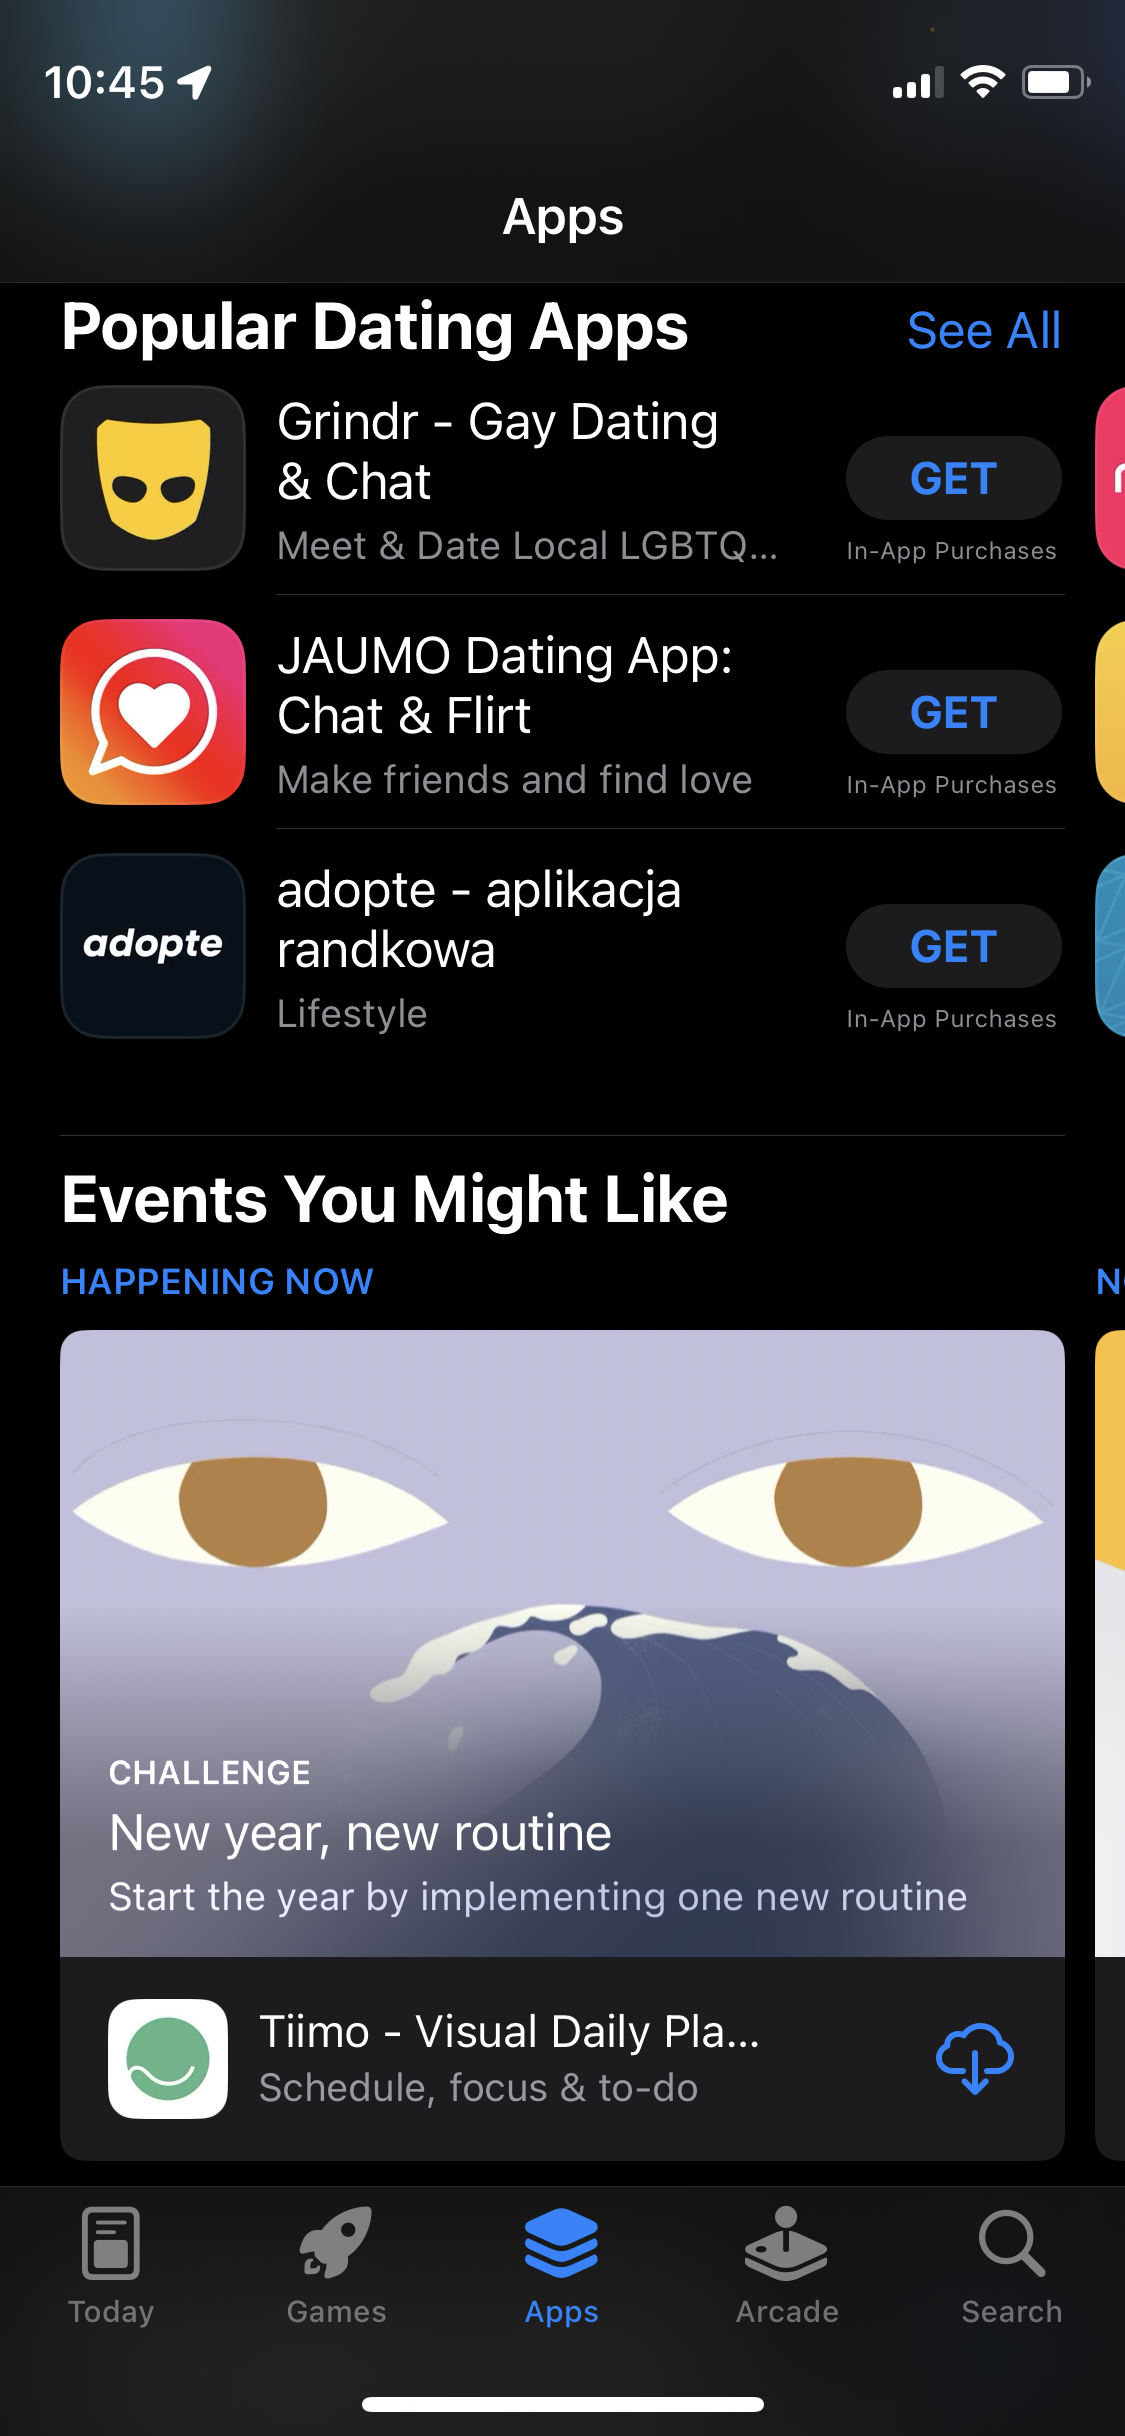
The Events You Might Like section in the Games and Apps tabs is another place that can help you promote your app. Below you can see examples of a Major Update introducing a new Season to the Hearthstone game in the Games tab and a Challenge encouraging users to implement a new routine for themselves in the Tiimo daily planner app in the Apps tab.

While the Event Card is the introduction to your event, the Event Details Page contains all the information you want to include to make sure your target audience is interested and will engage with your event. After a user taps on the Event Card the Event Details Page is presented to them modally, taking nearly the entire space of the screen.
There, users can find, aside from the same event type and the name they’ve already seen in your Event Card, a longer, more detailed description of the event and a share button. It opens the standard iOS sheet for content sharing, allowing users to share interesting events with others. Take a look at an Event Details Page for the aforementioned event in the Hearthstone game.

The last place your In-App Events can be featured in is the Today tab. However, this is not an easy endeavor. To get a chance of being featured in the opening tab of the App Store you must first contact Apple's team of editors. To do so, you must fill out a long form that can be found here.
While filling out the form, in the “What would you like to tell us about?” field, select “In-App Event in my app on the App Store”. Then you must fill out the rest of the form with information convincing enough to make the Apple team of editors feature your event. Here you can learn more about how to get featured on the App Store.
Your app can be purchased and downloaded from both the Event Card and Event Details Page. If a user downloads and opens your app this way, instead of a standard opening screen designed for new users, they will be immediately navigated to the appropriate screens that will allow them to participate in the event. This is possible thanks to the Deep Links mechanism.
In fact, you are required to prepare a functional Deep Link and ensure that your app handles it properly, both moving the user to the event-related screens and moving them through the appropriate onboarding process, if they are new to your app. If your app does not support Deep Link or you’re unable to prepare one, you will be unable to create an In-App Event. You can use either a Universal Link or a custom URL, though the former is recommended by Apple.
You can find more information regarding creating Universal Links and preparing your app to use them here. One more thing to keep in mind is that if your Deep Link opens a web page your Event will be rejected by Apple’s review team.
Once your In-App Event is up and running you can track how well it’s doing using App Analytics in the App Store Connect. Apple provides you with a lot of useful information that can influence how you approach the marketing of your application and allow you to evaluate how successful the event was.
You’ll be able to learn exactly how many users decided to download your app from the Event Card or Event Details Page and how many asked to be notified about the start of the event. You’ll have access to real-time data regarding the engagement of your users. And you’ll know where your users found out about your event.
Apple provides an API for the creation and management of the events. This can be a great help for those who want to create numerous events in the future, but don’t want to deal with Apple’s UI every time. If you have a CMS that you’re familiar with or you want to automate the process even further using your backend I highly encourage you to familiarise yourself with the tools available. The Apple docs regarding the events are here.
The last piece of information I want you to keep in mind is that applications that are only available on the Apple Watch cannot have In-App Events. Now you know all the most important information about the In-App Events. We can proceed to describe what kinds of events can be promoted using In-App Events, what makes a good In-App Event and what makes a bad one.
Types of Events You Can Use
Not all events can be promoted using In-App Events. There are a couple of conditions that must be fulfilled. It must be a unique event with clearly defined start and end dates. It also cannot last more than 31 days. It shouldn’t be repetitive, so you’re encouraged not to start the same event right after the previous one has finished.
You shouldn’t use In-App Events to promote daily or weekly tasks present in your app. And you should avoid trying to use In-App Events to advertise your app across the App Store if there is no event at all or the event you try to promote has no content, like a discount on one of your In-App Purchases.
There are in fact certain types of events that are listed as good fits for an In-App Event. You will have to choose one of them as you create your In-App Event, so make sure that you’re event falls under one of the categories below:
- Challenge: Your event is a Challenge if you expect your users to do a certain task in a limited amount of time. In a game app, you can release a new level for your game and reward users who finish it within two weeks of release. In a fitness app, you may encourage people to do 15 training sessions in a month.
- Competition: Your event is a Competition if you give your users an opportunity to compete against each other for the duration of the event to obtain some sort of reward. In a game app, it may be a limited-time tournament. In a habit-tracking app, you may ask users to start a new habit and reward those who have the longest streak without breaking it.
- Live Events: Your event is a Live Event if you allow people to take part in some sort of happening in real time. You can stream things like a sports match or a one-time performance of an artist.
- Major Update: Your event is a Major Update if you release a new version of your app on the App Store and it contains a significant redesign of your app or a new, meaningful feature. This type of event can be used to increase the chances of your users using the most recent version of your app so they don’t miss the big things you prepared for them.
- New Season: Your event is a New Season if you add some new, unique content. In a video-on-demand app, it can be a new season of an established series. In a game app, it can be a new season of multiplayer competition, that resets some progress and allows players to obtain new rewards.
- Premiere: This category is similar to the New Season category, your event is a Premiere if you introduce new content to your app. This time however it must be the first time this content is released. In a video-on-demand app, this can be a premiere of a new movie, not shown anywhere else before.
- Special Event: Your event is a Special Event if it doesn’t fit any of the other categories mentioned above. If you have an event you consider worthy of being advertised, you can go for this category, just keep in mind what is written at the beginning of this section about what events can and cannot be used as an In-App Event.
Use In-App Events to Promote Your App
While the main benefit of using In-App Events is the promotion your app gets throughout the App Store you can still advertise your events in more traditional ways like emails or social media. A tool that is very useful for custom marketing of events is a Marketing URL. This means that you can directly send a link to your In-App Event Details Page to your audience. This link will continue to work even after the event itself ends, it will then just redirect users to the Product Page of your app.
In-App Events can also be of some help if you want to increase the revenue of your In-App Purchases. It is allowed by Apple to require your users to purchase a specific IAP or Subscription before they’re able to participate. And while just providing a discount can’t be the main event you’re advertising, you can reduce the price of the In-App Purchase as your main event goes live if you think it will be beneficial to your sales.
How to set up In-App Events in App Store Connect
To create an In-App Event you must have a role of an Account Holder, Admin or App Manager. If you have the correct role, sign in to the App Store Connect and enter your app Product Page.
From the menu on the left side of the screen select the In-App Events (1) option under the Features section, then click on the blue “+” button next to the In-App Events title (2) or on the big “Create In-App Event” button below (3).

Alternatively, if you’ve started working on an event before and want to continue you’ll have access to your drafts (4).

Now you need to enter a Reference Name. It will not be visible to your users but it will be the name your event will be referred to in App Analytics. Max 64 characters.
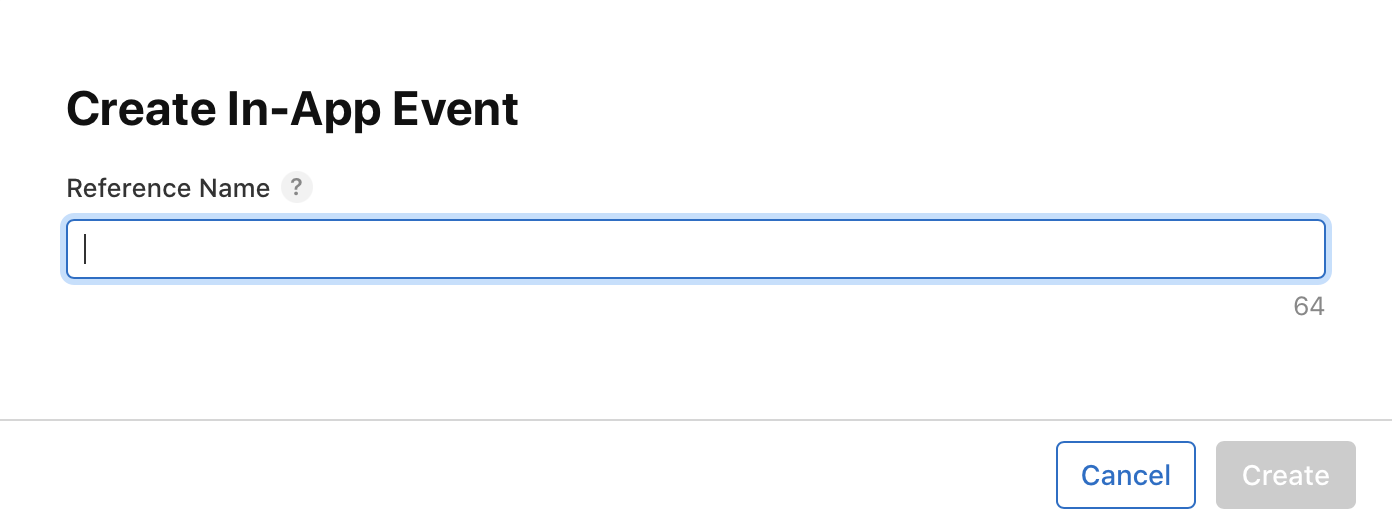
After choosing the Reference Name and pressing Create you’ll see a form. You need to fill it with all the information needed to launch your event.
- Language (5) - You can have your event localised for each language that your app supports. If you decide to localize your event you will need to provide all the data listed below in all supported languages.
- Name (6) - A name of your event as will be seen by the users. It will appear both on the Event Card and on the Event Details page. This name cannot contain any calls to action, like “Join the Event!” or “Subscribe to experience new levels!”. The name should be in Title Case, which means that all major words should be capitalized. Max 30 characters.
- Short Description (7) - A brief description of your event. It will appear on the Event Card. Max 50 characters.
- Event Card Media (8) - An image or a video that will appear on the Event Card. If you want to use an image it must be in .jpg, .jpeg or .png format, have an aspect ratio of 16:9, a minimum resolution of 1920x1080 pixels and a maximum resolution of 3840x2160 pixels. If you want to use a video it must be in .mov, .m4v or .mp4 format, have an FPS of 30 or 60 and fulfill the same resolution and aspect ratio requirements as an image.
- Long Description (9) - A longer description that appears on the Event Details Page. Max 120 characters.
- Event Details Page Media (10) - An image or a video that will appear on the Event Details Page. If you want to use an image it must be in jpg, .jpeg or .png format, have an aspect ratio of 9:16, a minimum resolution of 1080x1920 pixels and a maximum resolution of 2160x3840 pixels. If you want to use a video it must be in .mov, .m4v or .mp4 format, have an FPS of 30 or 60 and fulfill the same resolution and aspect ratio requirements as an image.
- Badge (11) - A type of your event. Choose one from the drop-down list. They’re described in greater detail in the “Types of Events You Can Use” section above.

- Timezone (12) - Select a timezone for the dates you’ll set next.
- Availability (13) - Here you can select if you want your event to be available in all regions supported by your app or if you want to restrict it to some chosen countries.
- Start Date and Time (14) - Choose a date and time when the event will start.
- End Date and Time (15) - Choose a date and time when the event will end. This date can be no more than 31 days after the start date.
- Publish Start Date and Time (16) - Choose a date and time when the In-App Event will be published on the App Store. This date can be no more than 14 days before the start date.
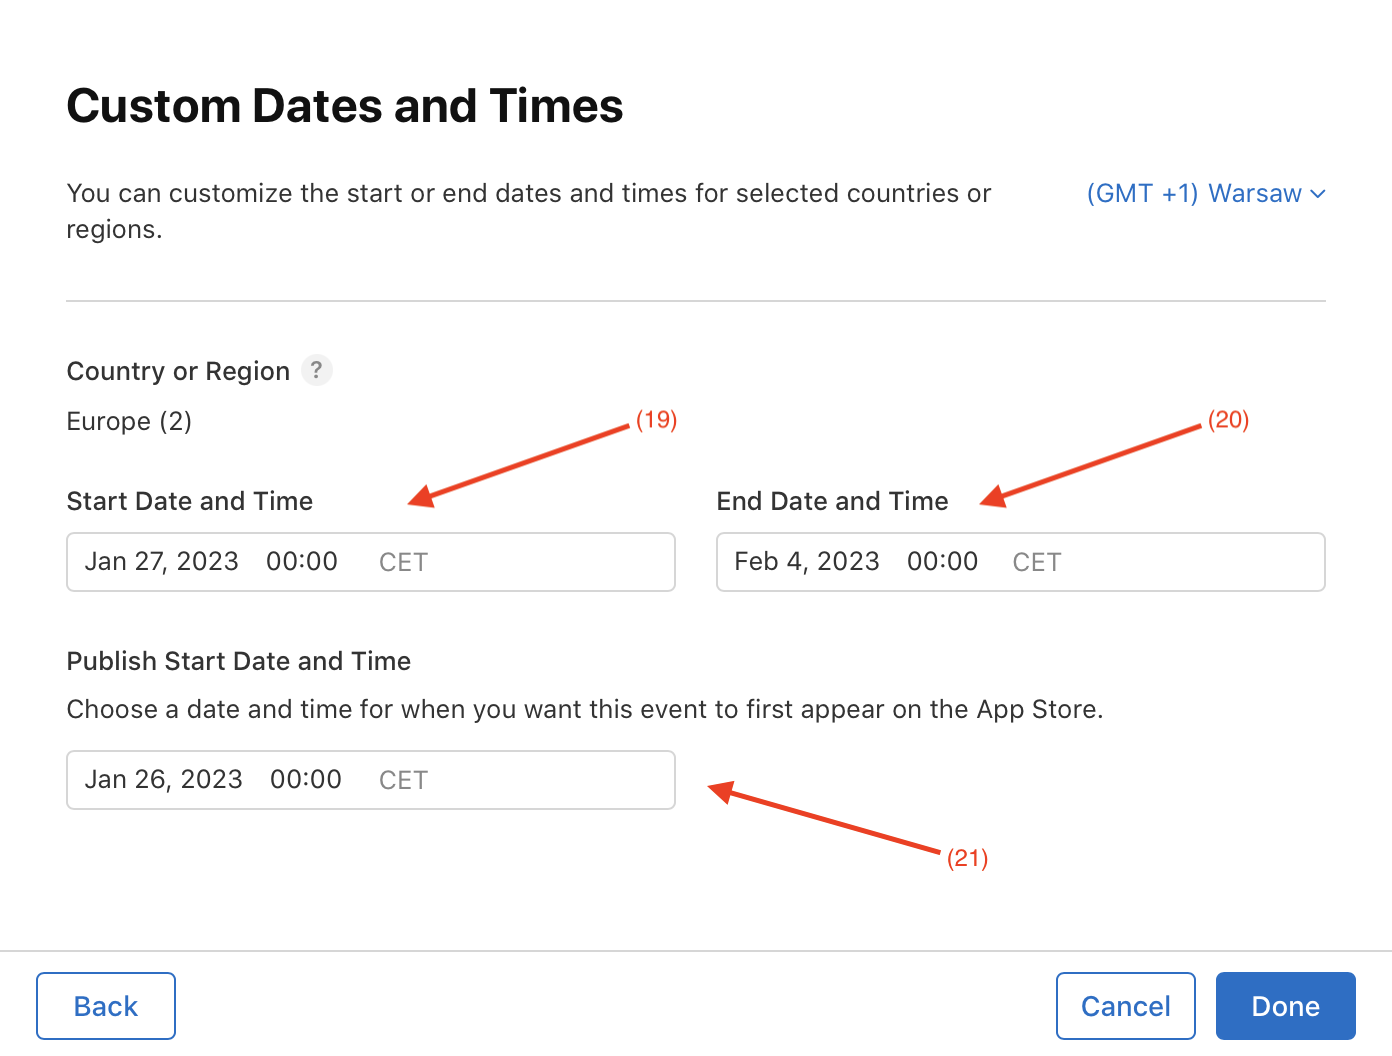
- Customize Dates and Times (17) - If you want to change some of the dates above in some of the supported regions you can do it using this button. First, select the regions you want to customize (18) and press “Next”. Now set the Start Date (19), End Date (20) and Publish Start Date (21) for selected regions and press “Done”. From this screen you can add new custom dates for another set of regions (22), change the time zone (23), change the regions for the custom dates (24), remove the custom dates (25) and return to the main form (26)


- Edit Custom Dates and Times (27) - If you have some custom dates this button will replace the “Customize Dates and Times” button. If you press Edit you will move to the same screen with a list of your custom dates that you end up on when you create a new custom date.

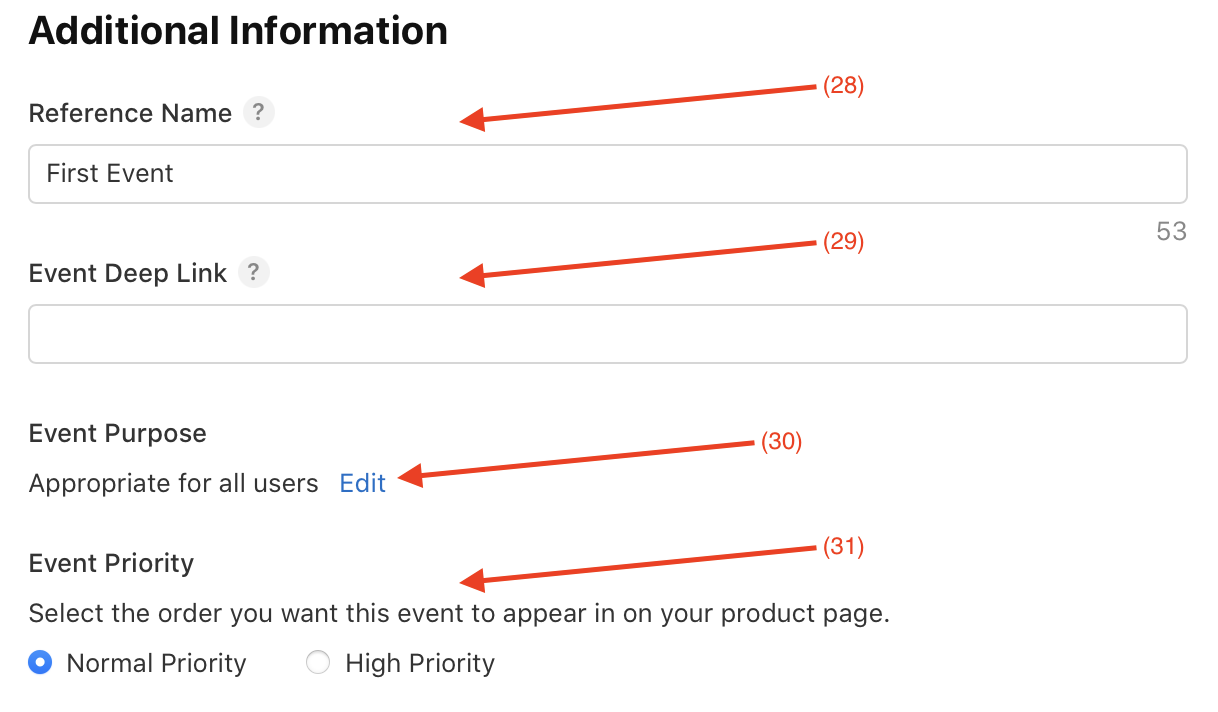
- Reference Name (28) - You can modify the Reference Name you’ve set before.
- Event Deep Link (29) - A Deep Link that navigates users to screens related to your event. You can read more about it in the “About In-App Events” section above.
- Event Purpose (30) - Select one of the following purposes for your event. It will influence the way the App Store advertises your In-App Event to its users.
- Appropriate for all users - App Store will advertise for all users in the same way. Choose this option if you don’t have a specific purpose in mind and want to get the attention of as many users as possible.
- Attract new users - App Store will focus on advertising your event to people who have never downloaded your app.
- Keep active users informed - App Store will show your events mostly to people who have recently used your app.
- Bring back lapsed users - App Store will prioritize displaying the event to users who have downloaded your app in the past but haven’t used it in a while.
- Event Priority (31) - You can have up to 5 In-App Events in one app. If you have more than one they are sorted chronologically, with the latest on top. If one of your events is more important than the others you can make it always appear on top by setting its priority to High and keeping all the rest at Normal.
- Required In-App Purchase (32) - You can make your users purchase an In-App Purchase to participate in the event. If you do so you should select the “In-App purchase Required” option from the drop-down list. If you require your users to have an active subscription to enter your event but there are no further purchases necessary you should select the “In-App Purchase Not Required” option.
- Event URL (33) - A URL you can use for marketing purposes to promote your event. If the event is active it leads directly to the Event Details page. Otherwise, it leads to the Product Page of your app.
- Delete Event (34) - If you want to delete a draft of an event or to end your event early you can use this button to do it.

Metadata Recommendations
After you fill out all the data in the form you can view the preview of your Event Card and Event Details Page. If it looks good to you, you can send the In-App Event to review. You need the approval of the Apple review team to release the event. If they reject it for any reason, follow their instructions to fix what they found to be incorrect.
While filling out the form there are some guidelines you should be aware of. As with any other data you’re showing to your users you should use proper capitalization and punctuation. While one exclamation mark in the description is fine, using multiple of them may get your event rejected. Never tell your users anything you can’t prove. You may think your event is the best one around but it doesn’t mean that it’s true.
Don’t put any price information, including such wording as “free of charge” or “no payments needed” in the name or description. You select the pricing for the app and its In-App Purchases at an appropriate place in the App Store Connect. Apple makes sure to convert it to all the necessary currencies and includes it in places easily accessible to users.
Avoid using texts and logos in the media. Both the Event Card and the Event Details Page will place text on top of your image or video. Putting more text in the media can make things much harder to read.
Both the Event Card and the Event Details Page should look similar and have a visual continuity. Utilize similar colors and media. Also do not add any borders or gradients to your media. They will be removed anyways.
And, most importantly, make sure to always have the full rights or the license to use everything, both text and media, you put in your metadata.
Should you use In-App Events
In summary, the In-App Events system introduced by Apple in iOS 15 is a great tool to help spread awareness of your application. As long as the event in your application fulfills all the requirements to be an In-App Event you should seriously consider using it. The App Store presence it will provide you cannot be valued enough.
Thinking about implementing in-app events in your mobile application? Write to us, we will help you.
Contents