
Navigation for sight-impaired people with haptics (Part 2)
Welcome back! It's time for Navigation for sight-impaired people with haptics — Part 2. In the previous blog post I focused on things less related to the navigation process but necessary to make it work properly. Here I cover how I used the results from the previous part to allow users navigate. If you haven't done it yet, check out Navigation for sight-impaired people with haptics (Part 1).
Contents
Assumptions
We, developers don’t like to deal with big things — especially when it comes to the source code. Big objects = big problems. Do you know the feeling when you needed to fix something in a big 1000-line file? 
Because of this, at the beginning of my work with this topic I decided to divide the navigation this way:
- generating the route, completing waypoints, rerouting (Group1)
- calculating deviation from desired direction (Group 2)
Which from user’s perspective would look like this:
- map
- haptic
Thus separation made it easy to add new features and find bugs. And of course it improved code testability! Very important for me also was data flow. All GPS data like location or heading are passed from Group 1 to Group 2 and that’s all. So no bi-directional data flow occurs.
Navigation
To generate route, calculate progress of navigation etc. I used a navigation service developed by Mapbox. I find it very useful and super easy to implement basic navigation with. It also provides great way to customize your navigation logic, which in my case was necessary. I won’t describe how I implemented all the basic logic for it — you can find great tutorials on the Mapbox website.
Because haptic logic (Group 2) relies on map logic (Group 1) I started my work with Group 1. The goal for this was to implement NavigationProvider which would pass GPS data to different objects like MapView (from View layer) and haptic object (Group 2).
To create a connection with MapView I used the well-known Delegate Pattern. In this case, it was necessary to make it bi-directional.
Why?
The provider needs to get information about user’s interaction e.g. the user taps to center the map at their location. This kind of information provider could only get from map view. But on the other hand we’ve got map — which doesn’t have any connection with logic — only displaying what the provider sends it. Check the image below to see a simple example of how to pass over the data:

Delegate Pattern required me to create two protocols: NavigationProviderDelegate and NavigationViewDelegate.
To make everything work I needed to add the below methods to the delegates:
protocol NavigationViewDelegate: class {
    func navigationViewDidAskToFocusOnUser(_ view: NavigationView)
}

protocol NavigationProviderDelegate: class {
    func navigationProvider(_ provider: NavigationProvider, didUpdateUserPosition userPosition: CLLocationCoordinate2D)
    func navigationProvider(_ provider: NavigationProvider, shouldFocusOn coordinate: CLLocationCoordinate2D)
}
NavigationViewDelegate‘s method is called when user taps on center button.
This event is passed over to the provider by calling on a provider object:
func focusOnCurrentUserPosition() throws {
    guard let location = location else {
        throw NavigationProviderError.couldntGetCurrentLocation
    }
    delegate?.navigationProvider(self, didUpdateUserPosition: location.coordinate)
    delegate?.navigationProvider(self, shouldFocusOn: location.coordinate)
}
Once MapView receives events from above delegate methods, it updates user’s marker position and centers the map on it. As you can see this approach has a lot of benefits. It prevents unwanted behaviour because no logic is done in the View layer. All orders come from the Provider. The only thing View can do by itself is load the map. Also, all processes are separated into small methods which makes the source less complex 
Kalman Filter
If you've read previous part, you may remember me paying attention to the noise. It’s a very common problem when it comes to working with GPS. In this project I used the Kalman filter which is great solution for getting a rid of noise and smoothing routes. You can check a few implementations on GitHub. My choice was HCKalmanFilter.
Mapbox requires a custom navigation implementation to pass the updates of heading and coordinates to the base object RouteController. Usually you can do it by creating an instance of CLLocationManager and setting the RouteController instance to the location manager’s delegate. Here things get more complicated because the standard delegate sends raw data which we don’t want — we want Kalman Filter to smooth it.
To do this, I needed to make a subclass of CLLocationManager.
import HCKalmanFilter

class KalmanLocationManager: NavigationLocationManager, CLLocationManagerDelegate {

    // 1
    weak var smoothedDataDelegate: CLLocationManagerDelegate?
    private var kalmanFilter: HCKalmanAlgorithm?

    // 2
    override init() {
        super.init()
        delegate = self
    }

    // 3
    func locationManager(_ manager: CLLocationManager, didUpdateLocations locations: [CLLocation]) {
        if let smoothed = getSmoothed() {
            smoothedDataDelegate?.locationManager?(manager, didUpdateLocations: [smoothed])
        }
    }

    // 4
    private func getSmoothed() -> CLLocation? {
        guard let location = location else {
            return nil
        }

        if kalmanFilter == nil {
            kalmanFilter = HCKalmanAlgorithm(initialLocation: location)
            return location
        }

        if let result = kalmanFilter?.processState(currentLocation: location) {
            return result
        }

        return location
    }
}
Explanation:
- We use additional delegate to pass smoothed data to Mapbox’s RouteController. It is necessary to have a data source both for raw and smoothed data and also the Kalman Filter object which stores and calculates everything for you.
- No big deal here. Just delegate the setup to receive GPS updates.
- Implementation of the delegate’s method. It's called each time GPS detects changes. Calls getSmoothed() method which returns new smoothed location if Kalman Filter is able to calculate it.
- The most important method. It checks whether the manager is already using Kalman Filter. If not, it initializes it. The only thing I needed to do is to call method processState with a new location. It should return a smoothed location.
The final thing to do is to set smoothedDataDelegate to RouteController instance. From now on the navigation controller receives smoothed data 
Haptic Navigation
After base navigation mechanism had been done, I proceeded with the work on haptic navigation (Group 2). During navigation the user is allowed to make two kinds of movement:
- move forward as the crow flies
- stand and turn around in place
This movement depends on haptic feedback the user gets from the device. If the device is not vibrating, it means user is moving in the right direction. If device starts to vibrate, user needs to stand still and turn around until device stops vibrating. This is how navigation should look like.
So, two important aspects of this behaviour are:
- verifying if user moves in the right direction
- giving haptic feedback
In this section I’ll focus on the first aspect and show you how I had used position offset calculated in previous text.
To verify if user moves in the right direction I needed to determine a few things:
- next route waypoint heading
- user heading
- position offset calculated in Part 1
Waypoint heading required me to do some math calculations to get it and the only inputs I’ve got are user and waypoint coordinates. To calculate it I used the atan2 function and translations. Next thing I dealt with was the current user heading. Remember that during these calculations the device can be anywhere e.g. in pocket. So the raw value of heading received from CLLocationManager is not true for us. We need to combine this raw value with the position offset. The offset calculated during calibration will now allow the application to determine where user is actually heading. In this case, true heading is where user currently points. It’s related to any movement user can do — they can go straight forward or rotate in place (where rotation angle is where they face).
Combining those values was very easy:
var trueUserHeading: CLLocationDirection {
    return (userHeading - positionOffset)
        .positiveAngle
        .angleFrom0To360Degrees
}
userHeading represents the current value of the raw heading. positionOffset is the heading of the device calculated during calibration process. A subtraction gives true user heading which can be successfully used in next operations. Look at the image below to understand better why this calculation look like this:
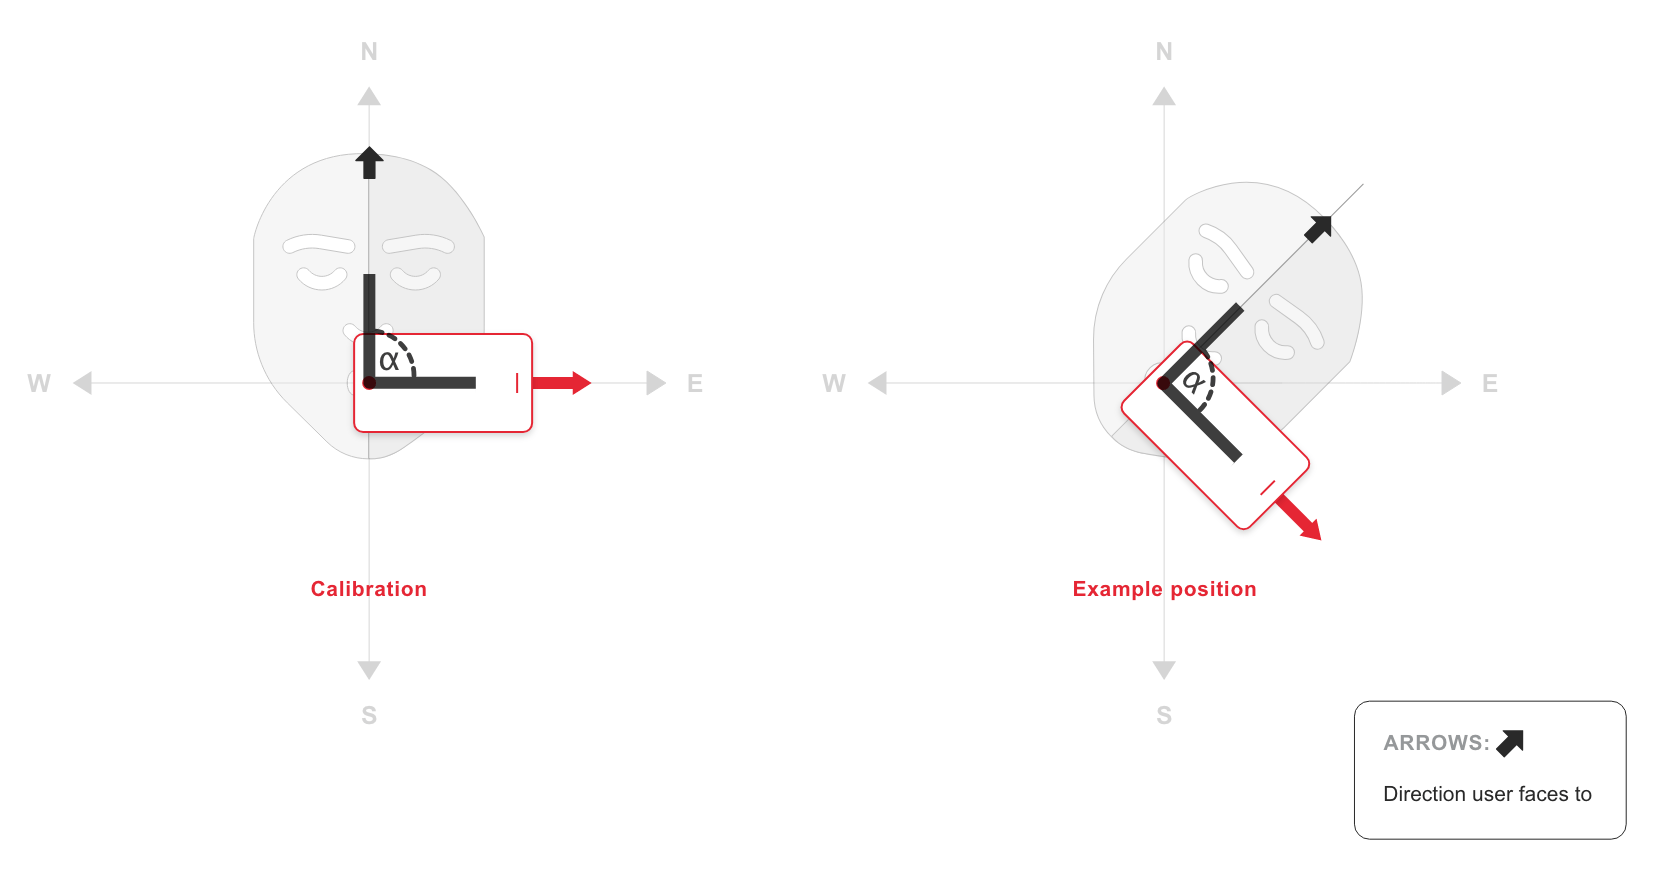
As you can see during calibration the device position rotated by 90° which meant the user was pointing to the North and the device in the pocket was pointing to the East. So let’s assume device raw heading is equal to 135°. To get true user heading we need to subtract raw value by offset so 135° — 90° which returns 45°. It’s easy, isn’t it?
Once I got all those values, I moved to the final step — verifying movement direction.
func isUserHeadingToWaypoint(userHeading: CLLocationDirection,
                             userLocation: CLLocationCoordinate2D,
                             waypointLocation: CLLocationCoordinate2D) -> Bool {

    let waypointHeading = getWaypointHeading(with: userLocation, and: waypointLocation)
    let tolerance = Settings.headingDeviationTolerance
    return userHeading > waypointHeading - tolerance && userHeading < waypointHeading + tolerance
}
I’ve added deviation tolerance to calculations which make it possible for the user to be directed in the right direction. It’s the same situation we have in searching for North in calibration. It is impossible for user to point to exactly 0° so we need to increase range. Final line checks whether a user’s true heading is in range. If so on, the remote device stops vibrating which means user is moving in the right direction! That’s all! The only thing to do is to send haptic feedback to the remote device to inform user about the result. The navigation logic is done 
Haptic feedback
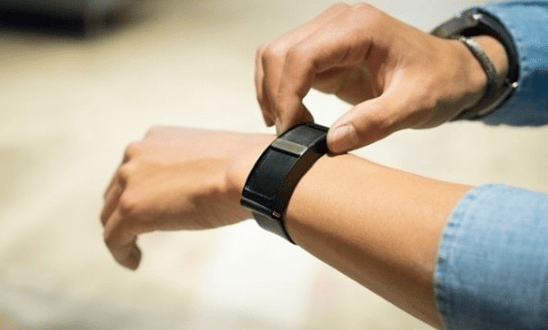
You may have noticed I mentioned a few times about remote haptic device. To be honest, it was first time for me to work with such a device. And it’s very interesting and offers great options which the iPhone doesn’t do. The application allows users to connect with Wayband which you can see on the image above. It’s a motor device whose main task is to vibrate. It has a built-in button used to turn it on and off but there are plans to make it interact more with the application.
I used the Bluetooth UART service which is a great way to exchange data bi-directionally. It has two characteristics: RX — receiving data from a peripheral, TX — sending data to a peripheral. One of the main advantages of Wayband over iPhone is that it’s possible to adjust the haptic volume — how strong the vibrations are. It was very important for us because it allowed the user be informed if they should turn right or left when the device vibrated. And it also can vibrate while application is in background mode — which is impossible for the iPhone. You probably would ask what if user didn’t have Wayband. Actually, it’s not a problem because I’ve implemented a mechanism which toggles between Wayband and iPhone haptic if necessary. Obviously, iPhone’s haptic capabilities aren’t as good as Wayband’s but I still managed to get everything work with only the iPhone.
Conclusions
I hope you enjoyed these two posts about providing navigation for sight-impaired people. There was a lot of detailed information but I think it was useful and perhaps it will help you to solve your future problems in code. And remember about implementing Accessibility features in your application. You never know who will use your application. So if they see you’ve done it, they’ll be pleasantly surprised 

Contents

