Publishing Android Apps on Google Play Store
Statista’s publication about the market share of mobile operating systems worldwide 2012-2021 reveals that in June 2021 Android maintained its position as the leading mobile operating system worldwide, controlling the mobile OS market with a close to 73% share. That’s why when you decide to create a mobile app, it’s probably a good idea to develop it also for Android users and publish it on Google Play Store – the most popular app distribution channel attracting millions of users.
After our guide on how to upload a new app to the Apple App Store, there comes time for apps published on Google Play. So here you can find a complete, step by step guide on publishing an Android app on Google Play Store.
Contents
Create your app
When you log into your developer account on Google Play Store Console go to the left navigation menu and select “All apps”. Here you will find a “Create app” button in the upper right corner. On this page you will have to provide some app’s information:
- App name
- App’s default language
- Whether it’s an app or a game
- Whether it’s a free or a paid app
Pricing and distribution section
You don't need to attach importance to these values at this stage, you can change them later. Keep in mind that as long as your app has not been published, Google Play Store enables you to change your decision on whether it is free or paid, but once published you can only change your app from paid to free. If you decide to charge users of your app, you must build a new one with a different package name and set the price. In the “Declarations” section you have to acknowledge the “Developer Program Policies”, “US export laws” and also accept the “Play App Signing Terms of Service”. Then you can click “Create app” to continue.
Set up your app – overview
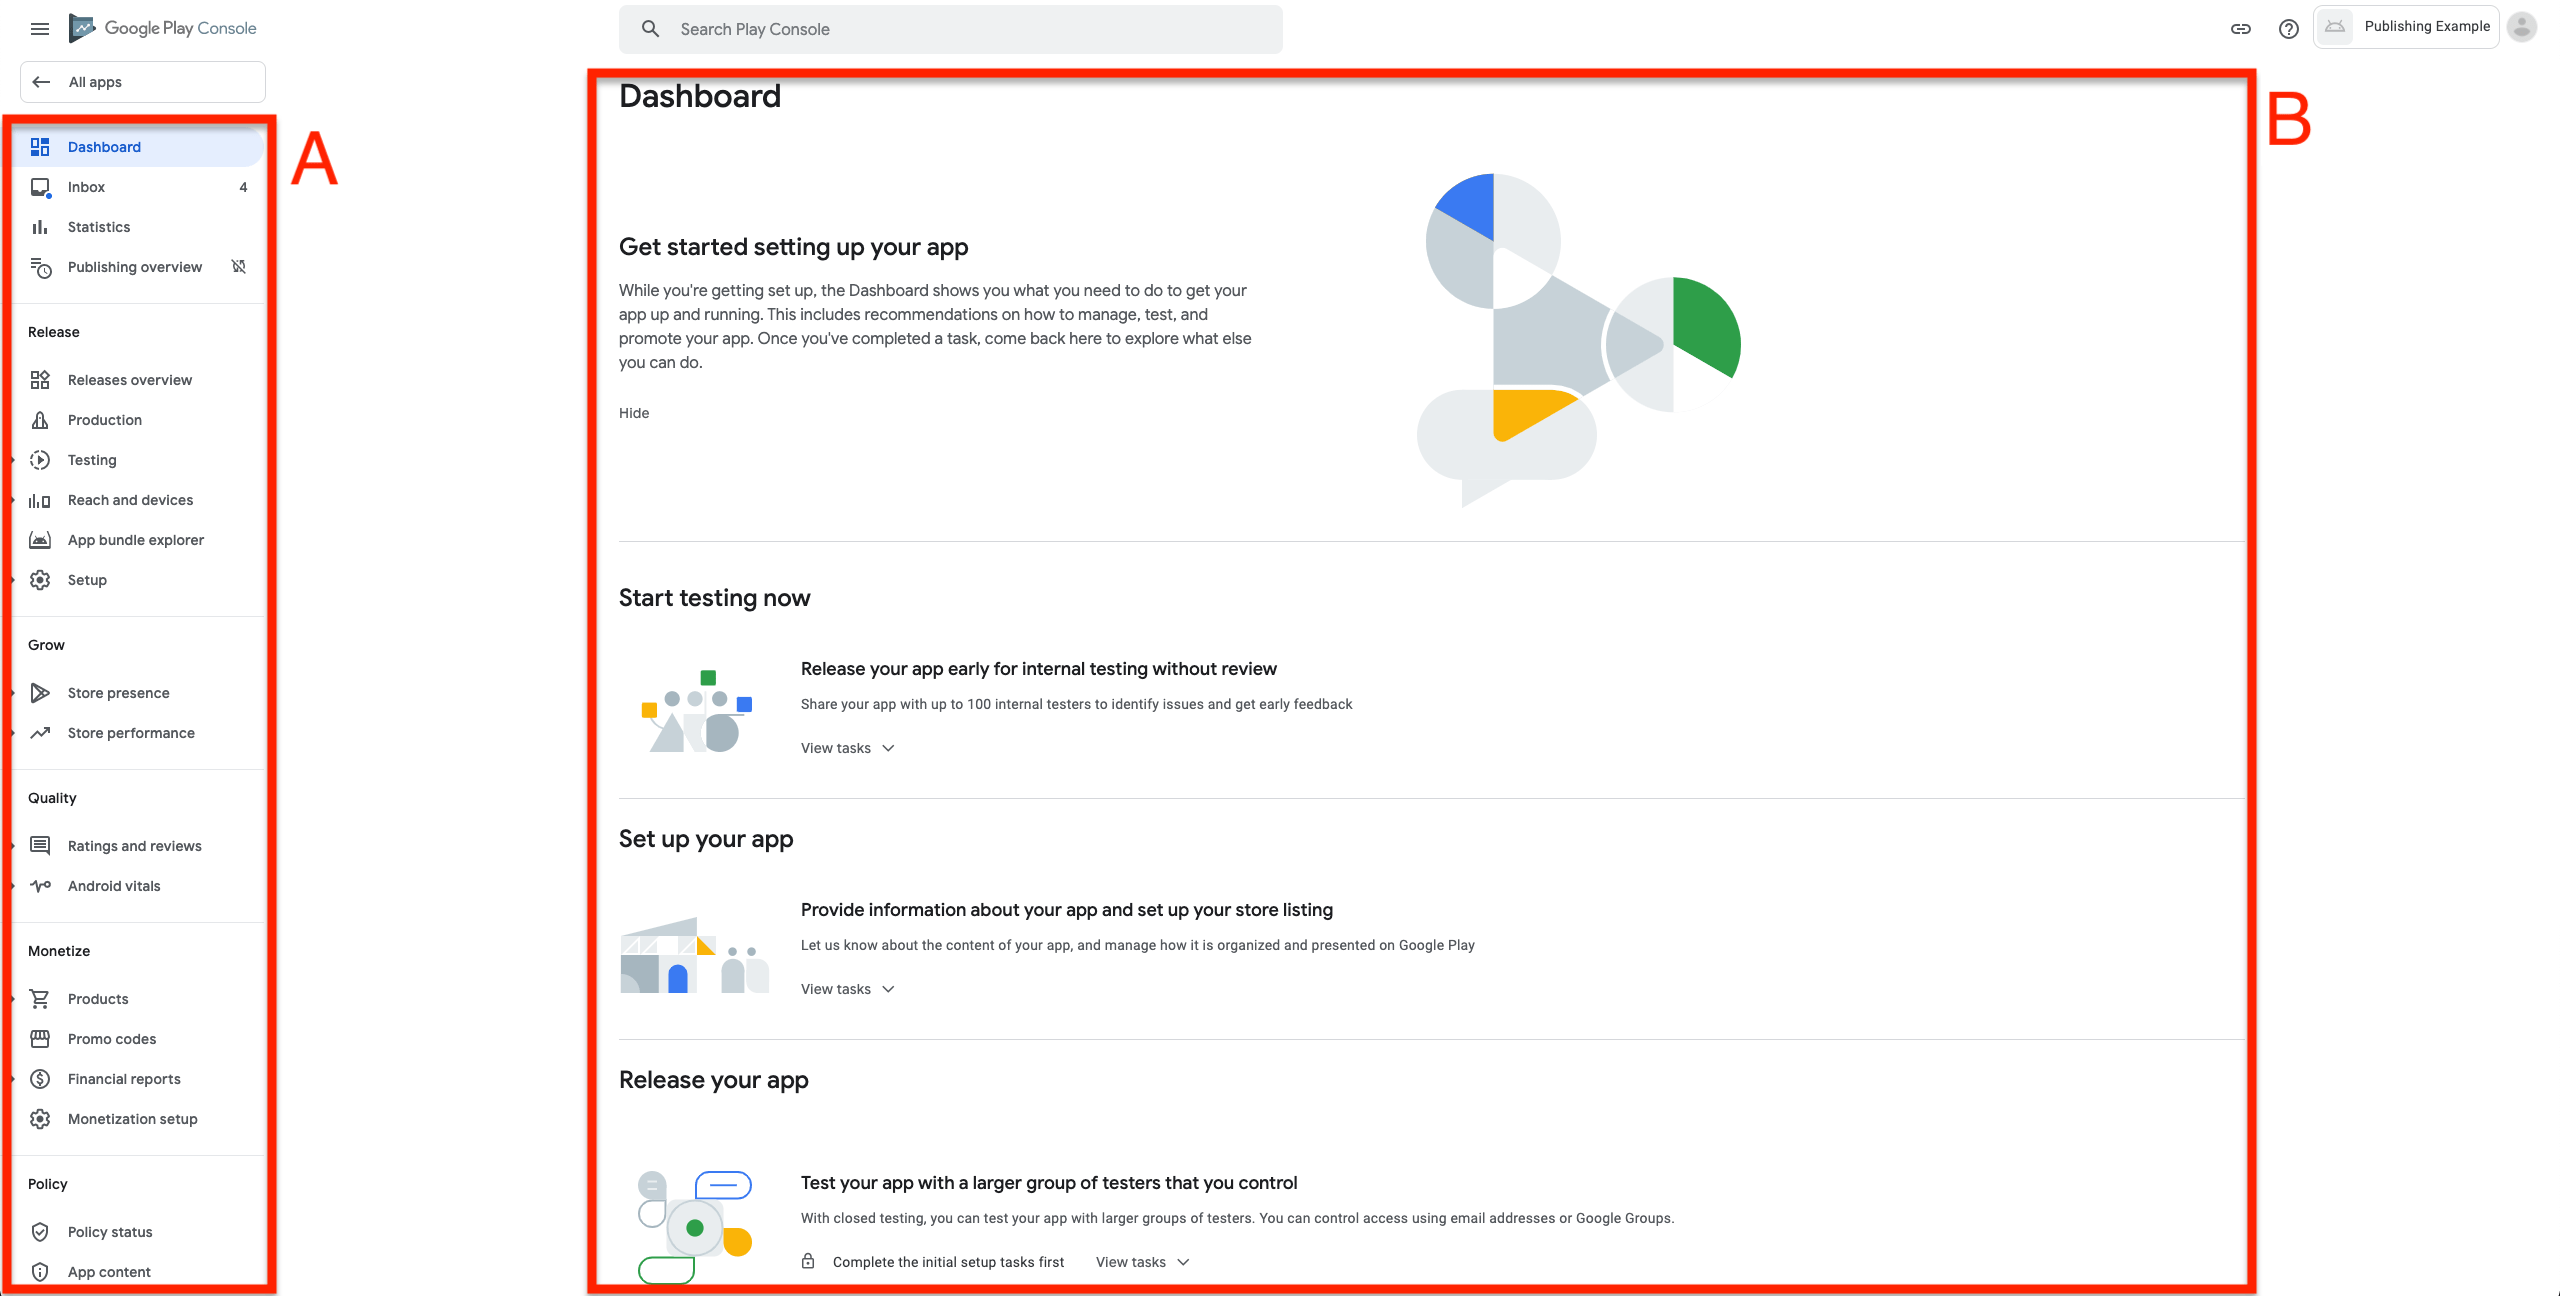
From this point, there are two approaches that you can use to publish your app. You can follow and complete the different tasks included here in this dashboard (B in Figure 1) or you can use the left navigation menu (A in Figure 1) to complete them in your preferred order, but in this case you will need to know where to find each task in this menu hierarchy.

Figure 1. Setting up a new app in Google Play Console
Different sections are organized here in the order that the Google team suggests you implement when publishing a new app. That means you should start with an internal testing.
Google Play Console provides many tools for testing your app in the pre-launch phase. Here we will focus only on steps that are required to get your app published in production on Google Play Store making it possible to download it. That means we’ll focus on two sections from the dashboard: “Set up your app” and “Publish your app on Google Play” (you can find more information about internal and beta testing in this article).
One thing that is important to know is that the dashboard will display different information depending on what stage of deployment you are on. For example, after publishing the app on the dashboard page, a screen with statistics and metrics about the app will be displayed, so when you need to publish an update you will have no other choice than to use the navigation menu. For this reason, we will be using the navigation menu rather than the dashboard later on.
Required steps
“Policy” – “App content”
You will need to complete all tasks in this section except for the “Privacy policy” that is required only if your target audience includes children under 13. You're also not required to complete the tasks in this order, you can skip one and come back to it later.
Privacy policy
Even though the privacy policy is not always required it’s good practice to add one. You will only need to paste the link that will redirect the users to your privacy policy page on the website.
Ads
Here you have to declare if your app displays ads or not, this will be visible to the user that wants to download your app on the app download page.
App access
Since Google will review your app, you need to give them access to it. So if parts of your app are restricted based on logic credential, memberships, location, or other forms of authentication, you must provide instructions on how to access them.
Content rating
Here you need to complete an IARC (International Age Rating Coalition) questionnaire, to receive an official content rating for your app. These ratings will be displayed on your app page on Google Play Store to help users identify whether your app is suitable for them. First, you have to enter an email that will be used to contact you about your content rating. Then, select the category that best suits your app and answer some questions about your app’s content (e.g. violence, sexuality). Finally, there will be your app ratings for different places in the world.If you agree with everything, click “submit”.
Target audience and app’s content
Here you can decide about the target age group of your app. This helps to make sure that apps designed for children are safe and appropriate. As mentioned earlier, if you want to target children under 13, you will have to add a privacy policy.
News apps
Here you have to answer the question: Is your app a news app? If you choose yes, you will have to provide some information on how you source the news content that is shown in your app.
COVID-19 contact tracing and status apps
Here you will let Google know whether your app is a COVID-19 contact tracing or a status app.If it is, you will have to confirm that your app complies with the Google Play developer requirements for coronavirus disease 2019 (COVID-19) apps.
Data safety
In this questionnaire, you’ll be asked to provide information about the user data collected by your app. The information you provide will be shown on your store listing to help users better understand your app’s privacy, security and data handling practices before they download it.
“Grow” – “Store presence” – “Store settings”
App category
In this section you will need to choose an application type, category, and tags that describe the content or main function of your app. You must choose those values carefully because they will help users discover your app on Google Play Store. The app type is one of the selections that we made earlier when creating the app, for the category you can choose only one. Tags are not required, but they’ll help potential users find your app. In the list, you may choose up to five tags describing content and functionality of your app.
Store listing contact details
For your contact details, you have to provide at least an email (optionally also a phone number and website). Your contacts will be shown to the users on Google Play, just in case they would like to contact you.
External marketing
If it’s checked, you allow Google to advertise your app outside of Google Play Store. This is free, so it is always a good idea to leave it checked.
“Grow” – “Store presence” – “Main store listing”
App detail
This section is probably where you will spend most of your time and also the one that requires more planning. That is because your app name (up to 50 characters), short app description (up to 80 characters) and long description (up to 4000 characters) will play an important part in helping the user find your app in the Google Play Store. Use the right keywords but also be careful with them. It is a good idea to review all program policies to avoid getting your app suspended on the Google Play Store in the future.
Graphics
They help you show your app’s features and functionalities. The app icon, phone and tablet screenshots should make a great first impression, and therefore drive more downloads for your app. All the graphic assets are mandatory, except for the promotional video. There are specific requirements for each graphic asset:
- App icon – must be a transparent PNG or JPEG, up to 1MB, 512 px by 512 px, and meet Google’s design specifications and metadata policy.
- Feature graphic – must be a PNG or JPEG, up to 1MB, and 1024 px by 500 px.
- Video – a YouTube URL. The video must be public or unlisted, ads must be turned off, it must not be age restricted, and it should be a landscape.
- Phone screenshots – upload 2-8 phone screenshots. Screenshots must be PNG or JPEG, up to 8MB each, 16:9 or 9:16 aspect ratio, with each side between 320 px and 3840 px.
Translations
Requirements for the phone screenshots are the same for the both 7-inch and 10-inch tablets, but you should have specific screenshots for each device size. You can add translations for your app details and screenshots by clicking on the “Manage translations” drop-down menu at the top and choosing “Manage your own translations”. An empty store listing will be created for each language you add, so you can provide your own translated text and assets. If you add translations for your store listing without localized graphics, Google will use the graphics from your default language.
From this point, the app setup section is no longer visible in the dashboard, because you have completed all the required tasks. So now you can move to the “Release” section.
App release: “Release” – “Production”
Countries/regions
First, go to the “Countries/regions” tab to add the countries where you want your app to be available. Click “Add countries / regions”. If you want your app to target some specific countries, you can search them here. You can also choose all the countries by checking the topmost checkbox.
Releases
Next, move to the app release tab where you will have the possibility to upload your app To start, click “Create new release”. Before you can upload your app bundles you need to choose if you are going to manage your app singing or let Google Play manage it for you.
When using Play App Signing, keep in mind that if you lose your upload key, you can contact Google to revoke your old upload key and generate a new one. That way, you can continue to upload new versions of your app, as well as updates to the original app, even if you change upload keys. You can read more about signing your app here.
App bundle
Now you can finally upload your app bundle. Since August 2021, new apps are required to be published with the Android App Bundle (.aab file) on Google Play Store. New apps larger than 150MB can use either Play Asset Delivery or Play Feature Delivery (read this article on the Android Developers Blog for more information). Release name will be automatically filled when the upload completes. Release notes are not mandatory, especially since it’s the first app release, but when you update your app, it is recommended to enter a brief description of the changes included in the update. You should provide release notes for each language that your app supports. Once it’s done, click “Save”, then “Review release” and finally “Start roll-out to Production”. After review, your app will be available to all Google Play Store users in chosen countries. Review generally takes one to three days.
Help section for an Android app
In case of any doubts remember that all the options and configurations in the Google Play Console are very well documented in the Help section, check Google Play Console Help for more.
Hope this guide was helpful for you and submitting an app on the Google Play Store is no longer a problem. Good luck implementing something new!


